Monday, September 22, 2008

PMD rule to check for unguarded log.debug() and install in Eclipse

Lately I've written a PMD rule to check that calls to log.debug() are guarded by some if (log.isDebugEnabled()) guard.

Adding it to the PMD commandline is relatively easy. Put the class in a jar and put it on the classpath:

snert:/devel/tools/pmd-4.2.3 hrupp$ java -cp \

  lib/pmd-4.2.3.jar:lib/jaxen-1.1.1.jar:lib/junit-4.4.jar:\

  lib/asm-3.1.jar:lib/my.jar \

  net.sourceforge.pmd.PMD /source/to/check text \

  ~/Documents/workspace/PMDRule/ruleset.xml


my.jar contains the classes and ruleset.xml the description for this ruleset

Now with Eclipse, things are a bit more complicated. There is a GUI to basically write
the ruleset.xml in the preferences, but how to add the rule class? I am sure, this can be
done via a Feature Extension, but I didn't find a description quickly.

So here is what I did:


  1. Shut down eclipse

  2. Locate the PMD core plugin in eclipse/plugins (e.g. net.sourceforge.pmd.core_4.2.1.v200804111600)

  3. Copy the rules jar (my.jar from above) to lib/

  4. Edit plugin.xml and add an entry for the jar:
          <library name="lib/commons-logging-1.1.1.jar">
    <export name="*"/>
    </library>
    <library name="lib/my.jar">
    <export name="*"/>
    </library>

    </runtime>


  5. Start eclipse with option -clean


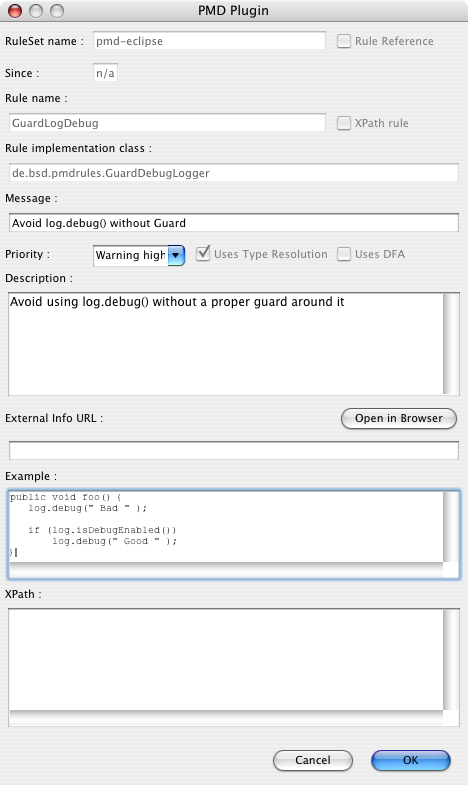
  6. Now go to the Preferences to the PMD->Rules Configuration section, click 'Add rule...' and add an entry for our new rule:
    pmd_rule.png


  7. Start chasing bogus log.debug() usages :-)

This rule is not yet perfect, as it lacks proper type checking for the 'log' variable. It will probably also fail for Statements like "if (cond1 && log.isDebugEnabled())".

You can find the code here.

Please let me know when you have solved the type checking or how to better integrate it with Eclipse.

Wednesday, September 17, 2008

Upcoming talk: JBoss Clustering and Monitoring-Suite in Zürich

Bela Ban and myself will give presentations at theJUGS Event 11.11.08: Jboss Clustering and Monitoring-Suite:

Bela will talk about Tips and tricks to get better performance out of JBoss Clustering

And I will talk about JBossON Management platform and RHQ, its open source upstream

You can find the complete description at the page of the Java User Group Switzerland, where you can also register for the event.

Tuesday, September 16, 2008

RHQ commits mailing list (updated)

We finally made it possible to track SVN commits from RHQ in a mailing list.
I know that many of us like this a lot, even if the view-svn function also allows easy browsing.

You can find the new list on Sourceforge mailinglists, where you can subscribe yourself or
also view the archive (which is pretty much empty while I am writing this post).

Update:

When I first wrote this post, messages were flowing but had no content. This is fixed now.

Monday, September 15, 2008

RHQ: decomposing plugins

I've been talking a lot lately about how to write plugins for RHQ / JBossON.
When you try to manage larger systems like the JBoss Application Server with all its subsystems like Cache, Transactions, JBossWeb etc. your plugin might get relatively large to support all this.
In this posting I will show you how to decompose a large(r) plugin into smaller ones that all together allow you to manage the large(r) system.

This decomposition not only allows you to more easily distribute the development load, but also enables re-use of the parts that have been broken out of the big chunk. The price you have to pay is relatively small and consists mostly of some additional directories and a maven pom.xml file (that I am not going to show here).

The basic trick is to use <depends> and <runs-inside> tags in your plugin descriptor (rhq-plugin.xml) for this new plugin:


<plugin name="JBossCache" ... >
<depends plugin="JMX" />
<depends plugin="JBossAS" useClasses="true"/>


So we need the JMX plugin and the JBossAS plugin (currently part of JBoss ON only) being deployed before our plugin can start. The attribute useClasses means that the classloader of our plugin gets access to the classes of the other plugin (JBossAs here). So we can use those classes too.


<service name="JBoss Cache" ...>


As you know from previous posts, a service can't just "hang in the air" - it needs another server or service as a container. This is where runs-inside comes into play:


<runs-inside>
<parent-resource-type name="JBossAS Server" plugin="JBossAS"/>
</runs-inside>

So our plugin service "JBoss Cache" will be contained in resources of type "JBossAS Server" that come from the JBossAS plugin (that we declared in the depends element earlier).

Apart from this little magic in the plugin descriptor, there is no more additional work to do.

Voilà, RHQ plugins à la carte ... :-)


Monday, September 08, 2008

OOO 3.0 RC1 is out - and does not longer immediately crash on Mac

Open Office released the first release candidate of OOO 3.0.

And opposed to the previous betas, it doesn't immediately crash on my mac (Tiger). Well, this sounds too bad, actually, I did not run it for too long and in this time it did not crash at all.
This does not necessarily mean that it is stable, but the previous versions did crash after that time.

UPDATE: I am just editing a 25 pages document without any issues, so it is really usable now.

I am really looking forward to a final version now.

Wednesday, September 03, 2008

Driving a digital thermometer with RHQ (Part 2)

After we have installed all prerequisites last time, we can now concentrate on the RHQ plugin itself.

temp_chart.png


I won't explain every little bit and will concentrate mostly on the hardware side. If you want to know more about plugin development, go to the RHQ plugin community pages and make sure to check out my RHQ plugin development series.

Plugin architecture


The following picture shows the (hardware) components involved:
onewire-arch.png

The DS9490 is the USB-1-wire adapter used. It has internally a DS1990 compatible uuid chip, that provides a unique id for the adapter. On the bus we have a DS1820 compatible thermometer and can have other 1-wire chips (future).

So our plugin will follow this hardware setup. For the DS9490 we will have a OneWireAdapterComponent + -Discovery and a separate component for the DS1820 plus its discovery component.

Plugin artifacts


Lets have a look at the individual artifacts of the plugin. I will not show everything in great detail -- check out the full source (see below).

Plugin descriptor


 <server name="OneWireAdapter"
description="A single OneWire(r) adapter hosting many devices"
discovery="OneWireAdapterDiscovery"
class="OneWireAdapterComponent">
 
<plugin-configuration>
<c:simple-property name="type"
displayName="Adapter type" required="true"
default="DS9490"/>
<c:simple-property name="port"
displayName="Adapter port" required="true"
default="USB1"/>
</plugin-configuration>

So we have a Server per USB adapter. The server has two configuration options for the kind of adapter and the port it is hanging on. For now, I have put some defaults in, as the code only supports the DS9490 kind of USB adapters anyway (and with all the legacy free PCs around, does anyone remember serial interfaces?). The server itself is hosting the individual types of chips as services:

      <service name="DS1820" 
description="DS1820 Thermometer chip"
class="DS1820Component"
discovery="DS1820Discovery"
>
<metric property="temperature"
defaultOn="true"
description="Temperature measured"
displayType="summary"/>

</service>
</server>

As the thermometer only returns one value - its temperature, we only have one numerical metric
that we show on the IndicatorCharts page by default (displayType=summary).

If you want to add more kinds of 1-wire (r) devices, you can add them as services next to the DS1820 service.

OneWireDiscovery


Now that we have seen the plugin descriptor, lets discover the USB-adapter: OneWireAdapterDiscovery.discoverResources() looks like this:

        Configuration pluginConfig = context.getDefaultPluginConfiguration();
String device = pluginConfig.getSimple("type").getStringValue();
String port = pluginConfig.getSimple("port").getStringValue();
 
DSPortAdapter adapter = new PDKAdapterUSB();
adapter.selectPort(port);

First we get the config property defaults from the descriptor. Then we create a new adapter object (this is the place where you could call into OneWireAccessProvider.getAdapter() from the 1-wire SDK to use other adapters). And finally we open the port. Next, we probe if there is actually an adapter present (the selectPort() above will probably already fail if none is present):

        boolean found = false;
adapter.beginExclusive(true);
found = adapter.adapterDetected();
adapter.endExclusive();


If everything is ok, we can put the adapter in the list of discovered details.
The unique resource key is determined by reading the uuid from the DS1990 chip in the adapter:

    private String getIdForAdapter(DSPortAdapter adapter)  {
 
Enumeration<OneWireContainer> devices =
adapter.getAllDeviceContainers();
while (devices.hasMoreElements()) {
OneWireContainer cont = devices.nextElement();
String name = cont.getName();
if ("DS1990A".equals(name) ||
"DS2401".equals(name) ||
"DS2411".equals(name)) {

return cont.getAddressAsString();
}
}

We loop over all devices on the bus and check if its a DS1990 or compatible. If found we return the address. We could additionally check if the device is a family 81 device in case that there are more
of those devices present.

At the end of discovery, we free the adapter again:
            adapter.freePort();


OneWireComponent


Now that we have the adapter discovered, lets look at the resource component for it.

First we need to start() it. This is simple. First we read the configuration data again.
Then we just open the port:

        if (adapter == null) {
adapter = new PDKAdapterUSB();
adapter.selectPort(port);
}

The check if the adapter has been set already serves to prevent multiple calls to open the same
port over and over again, which will fail.

Availability reporting uses the same adapterDetected() method as discovery above, so I won't show this again. Same for stop() - this just frees the port again.

In addition two methods are provided for the children:

reopenPort() frees the port and reopens it again. getAdapter() makes the shared adapter available to
the child classes.

DS1820Discovery


This class discovers the DS1820 thermometers.

public class DS1820Discovery implements 
ResourceDiscoveryComponent<OneWireAdapterComponent> {

As we implement the ResourceDiscoveryComponent matching the OneWireAdapterComponent just seen, we have access to this class and especially the getAdapter() method to use this shared adapter instance.

In discoverResources() we loop over the devices on the bus and see if they are of family 10.
In this case, we cast to the appropriate class and use the information from it to create the details:

        DSPortAdapter adapter = context.getParentResourceComponent().getAdapter();
OneWireContainer cont = adapter.getFirstDeviceContainer();
while (cont != null) {
if (cont instanceof OneWireContainer10) {
...
}
cont = adapter.getNextDeviceContainer();


DS1820Component


Finally the resource component also matches the OneWireAdapterComponent. Start()ing it mostly means getting the adapter and the resource key and to otain the right OneWireContainer from the adapter.
Stop() is a noop and availability reporting checks if the container is present or not.

The Implementation of the MeasurementFacet, getValues() does the real work in this class:

            if ("temperature".equals(metric.getName())) {
boolean good = true;
byte[] data = container.readDevice();
 
container.doTemperatureConvert(data);
Thread.sleep(100);
 
double temp = container.getTemperature(data);


As I have seen some strange spikes, I have added a check that if the temperature is above 75C, we don't report it. This could be optimized in a way that we store the last values to see if the high value is feasible. Or we could try to determine this from the device status somehow.

Getting the source


The source is available from RHQ svn, but not enabled in the main build. You have to go into the $RHQ/modules/plugins/onewire directory to build the plugin.

All resources are described on the Plugin page on the RHQ wiki

That's it


That's it - I hope you enjoyed these two postings and I'd love to see contributions to RHQ to drive other devices as well.
Tuesday, September 02, 2008

Driving a digital thermometer with RHQ (Part 1)

When starting this post I set the title to "Home automation with RHQ".

temp_chart.png


But this would have been a little exaggerated at first and perhaps RHQ is - if you don't have other stuff to monitor and manage - like to break a butterfly on a wheel. But anyway a system like RHQ is (or will be) well suited to be the central brain of a home automation system. Of course, if I say RHQ, this applies to JBossON 2 as well.

A bit of background


I was for the start just looking for a cheap USB thermometer, but was unable to find such a beast. What
I found was a relatively cheap temperature sensor at German electronics dealer Conrad electronics, but the usage wasn't simple to decode first :) So I searched further.

Inspired by an article in German Linux Magazin, I started to look at the 1-wire protocol (which the above sensor uses) by Maxim. This 1-wire bus can operate many devices daisy chained together. Each device has its unique id, so it can be directly addressed by it (and which also suits nicely the unique resource key constraint in RHQ). There is actually a whole bunch of devices for the 1-wire bus like hubs, power injectors, actors and sensors available -- even a LCD.

The first thing that is needed is an USB-Adapter DS9490R (I got it from http://www.1-wire.de/ here in Germany, there should be other vendors like e.g. Hobby Boards).

Next, we need a thermometer chip like the DS18S20. In addition some wire, a RJ11 connector, a soldering iron and some solder. For the wire you can just take an old telephone cord that has the RJ connector still attached.

Doing some hardware work


I hope you know on which end you have to hold a soldering iron :-)
(If not, get a DS9490B with a iButton version of the DS1820 (DS1920) and skip this section :-)

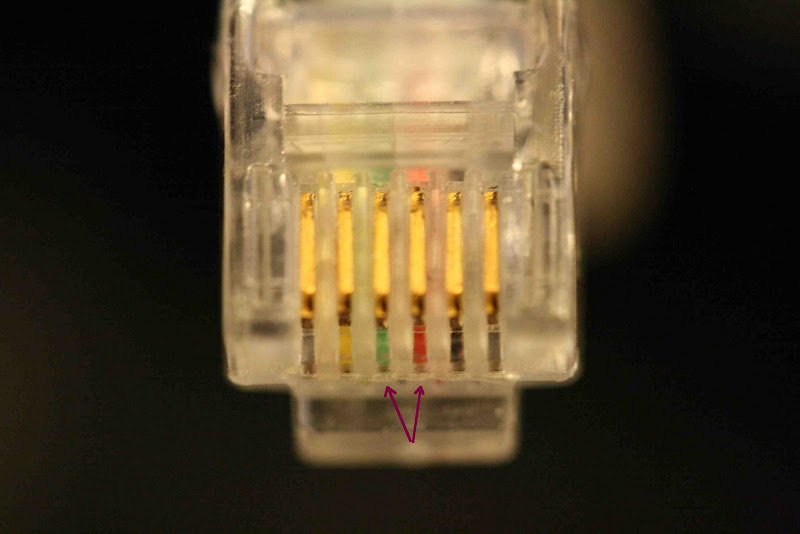
Ok, if not yet done, hook up the wire to the RJ11 connector. Actually we only need the middle two pins, that are marked in the next example:

  • RED (pin 3= data)

  • Green (pin 4 = GND)


IMG_4059.JPG


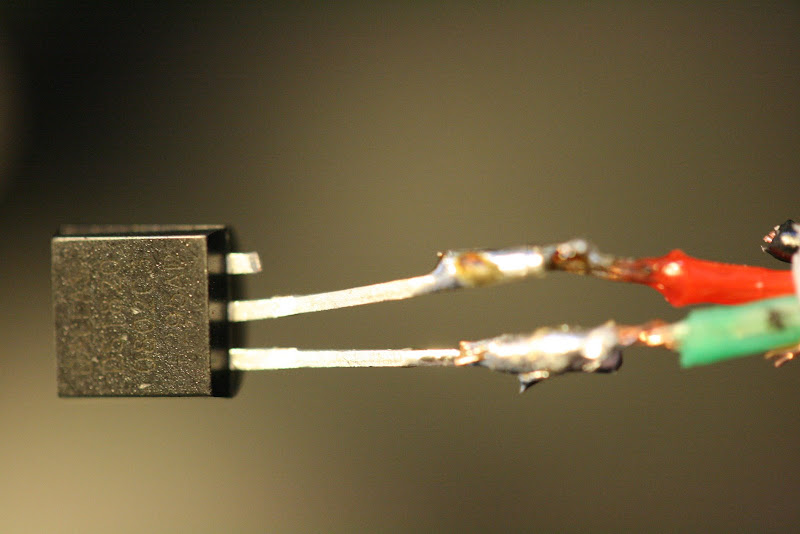
If this is done, heat up the soldering iron. On the DS18S20, you also only need two of the three pins, the rightmost can be used for external power, but is not needed in our case.

You have now to attach the wiring to the chip: put the ground (green in my example) on the left pin and the data line on the middle one - this could look like on the next image:

IMG_4060.JPG


At the end, put some isolation (duct tape) between the pins and wires and you are ready to go.

Installing the needed software


The installation of the needed software is a little hairy.
Basically it follows the example from comment #5 on this blog posting. It is written for Mac OS X, but will apply with minor changes to other systems as well.


  1. Download libusb and install it into /usr/local

  2. Download the PDK from http://globalreset.org/files/distribution/PDKAdapterUSB.tar.gz. Compile this by running make. If you are not on a Mac you probably need to change a few compiler settings. If this succeeded, you can run a test program via make test. This should output some stuff -- and especially that the adapter has been found. If you have attached the sensor to the adapter, it should print two lines that start on 'adress:' (e.g.:

    find first: true
    address: D70008017DFCC410
    address: 5D0000002B3C2081

    Install the created libonewireUSB.jnilib to /Library/Java/Extensions/ (if you are on a Mac, ymmv else).

  3. Download the 1-wire SDK from Maxim. This package contains a jar archive OneWireAPIsrc.jar -- extract this

  4. Add the class PDKAdapterUSB.class from the PDK into the right folder of the OneWire src that you just unpacked

  5. Compile the classes from the OneWire sources and build up a jar archive (OneWireApi.jar).

    If you want to use the example code from the OneWireApi, you have to modify OneWireAccessProvider.java to be able to load the PDKAdapterUSB. I also had to commend out a few java files for the serial adapter access, as they gave me compile errors).

  6. Install the OWlib in your local maven repo like this (replace /Users/hrupp with the path to your maven repo):

    mvn deploy:deploy-file -Dfile=OneWireApi.jar -DgroupId=com.dalsemi -DartifactId=OneWireApi -Dversion=1.10 -Dpackaging=jar -Durl="file:///Users/hrupp/.m2/repository/"


That's it for now, we now have all prerequisites. In the next posting I will describe how to write the RHQ part of this.

Friday, August 29, 2008

Lego-Olympics

Etoday had pictures of the HK Lego user group implementing Lego-Olympics 2008:
Those are pictures of the Olympic sites built with Lego bricks. Very cool.

Why conference calls fail (6)

Tuesday, August 26, 2008

RHQ: Compiling the apache snmp module on Mac OS X

RHQ and JBossON allow you to monitor Apache servers through its apache plugin. We have official support via precompiled plugins for Linux and Windows and instructions in the JBossON wiki on how to compile this for other Unixoids. While Mac OS X is a Unixoid (under the covers :-), the compile of the snmp module will not directly succeed.

I want to show here how to do that anyway (I did this against apache 2.0.63 from Macports):


  • First, if not yet done install Macports


  • Then, install libtool from within macports

    sudo port instal libtool

  • Chdir to <JON_AGENT_INSTALL_DIR>/product_connectors/apache-snmp/source

  • Edit the build script (build_apache_snmp.sh) to replace two occurances of libtoolize with glibtoolize

  • edit snmp_common/ucd-snmp/agent/auto_nlist.c
    to include <sys/types.h> : (around line 30)

    #include <sys/types.h>
    #include "asn1.h"
    #include "snmp_api.h"


  • Run the build as indicated on the build page

  • When adding the snmp module config to httpd.conf, specify /var/db for SNMPVar:

    SNMPVar /var/db


Done! :-)
You can now (re)start apache and take it into inventory.

To do this, please specify the root path of the server and the relative path to the htttpd binary, as apache2 from macports is called 'httpd' and not 'apache2', so it won't be correctly detected otherwise.

Tuesday, August 19, 2008

Reflection, the complicated way .. :-)

Just found that in some code, had to share this gem:

Object o = ...;
 
try {
bsh.Interpreter i = new bsh.Interpreter();
i.set("foo",o);
String bar = i.eval("foo.bar");
}
catch (bsh.EvalError e) {
...
}


Ok, not everyone is intimate with reflection and Interpreters often don't care what exact runtime type an object is (as long as you they are assignment compatible), but the effort to call BSH for this is as high as to write some reflection code for it :-) Also pulling in BSH mean for that piece of code to quadruple the binary size ...

Friday, August 15, 2008

RHQ monitor arbitrary JMX servers (Eclipse as example)

While RHQ is focusing on providing specific resource types with specific operations and metrics on them, it is possible to just connect to any JMX server (actually that code is in SVN Head as of today).

This example will show you how you could use this to e.g. monitor your Eclipse instance. This basically consists of two steps:
  • instrument the target app -- Eclipse in this case

  • manually add a JMX server to the RHQ inventory


Step 1: instrument Eclipse


Add the following to eclipse.ini:


-Dcom.sun.management.jmxremote

-Dcom.sun.management.jmxremote.port=10000


as we don't want for this example password authentication and ssl (of course you should do that for production, but we want to concentrate on how to initiate the connection at all), we disable it by supplying


-Dcom.sun.management.jmxremote.authenticate=false

-Dcom.sun.management.jmxremote.ssl=false


and restart Eclipse afterwards.

This page at Sun explains the various options for JMX remoting in JDK5.

Step 2: Manually add a JMX server in RHQ


Go to the inventory tab of the platform and select "Manually Add": "Jmx Server" below the list of child resources. Press OK

JMX_add_1.png


On the next screen select "JDK 5" from the drop down and continue:

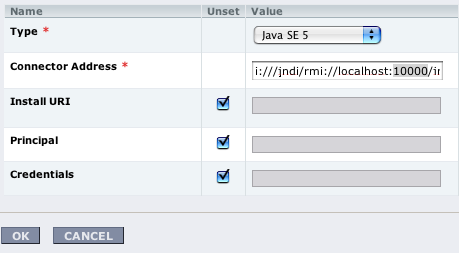
JMX_add_2.png


The following screen will show prefilled connection properties - here we need to set port 10000 from above:

JMX_add_3.png


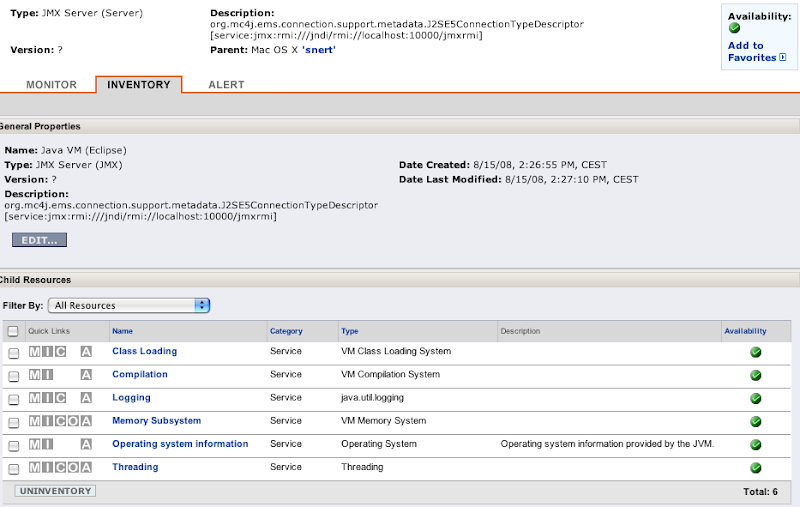
Click on OK and the new Java VM should appear. After some waiting, you will see the inidividual MBeans as you know it from other services in RHQ:

JMX_add_4.png


Technorati Tags:
,


RHQ server HA work

We have started to bring High-Availability to the RHQ Server. This is targeted for the upcoming 1.1 release later this year.

The installer has been updated to support HA and in the administration screens you will find a new section on High Availability, that lists the servers in a server cluster:

HA_servers_list.png


You can check this out and directly follow it in SVN head.

Wednesday, August 13, 2008

New version of iTunes Remote Control (iTRC)

The latest update of iTunes introduced an incompatibility with iTunes Remote Control, so ITRC did no longer work.
James is fortunately providing an updated version of iTRC that fixes the issues.
You can grab v1.4.1 from iTunes Remote Control.

Thanks James!

Monday, August 11, 2008

Visit to Legoland

Two weeks ago we've been in Legoland Günzburg, which is around 1.5h away from Stuttgart (by car; Günzburg is also reachable via train).
Parking and entrance was no problem. We had tickets that we ordered over the internet and printed them by ourselves. At the gates, those got just scanned in, so there was no waiting in line.

IMG_3704.jpg


Behind the entrance Orlando did for the first time not run away from a dog, but even approached it and patted it:

IMG_3706.jpg


First station was the little express train which does a tour thorough the park which enabled us to get an overview. Unfortunately this has been our first 10 minutes wait on the day with more to come (in total the park was not full and wait times were not too bad).

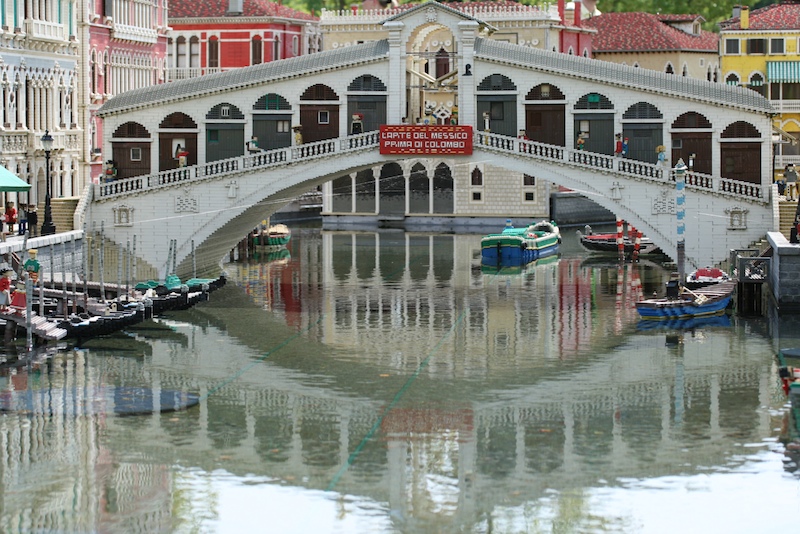
Next we went through Miniaturland (a landscape with different scenes, all in 1:20 scale). And this really was one of the greatest parts of Legoland. Not only we enjoyed it, but Marlene was totally excited. Whenever she saw a moving car in it, she exclaimed "Da!" ('There') and pointed to it. I think she could have been there for hours.

IMG_3724.jpg

(Rialto bridge from Venice, Italy)

IMG_3726.jpg


IMG_3727.jpg

(Brandenburger Tor, Berlin, Germany)

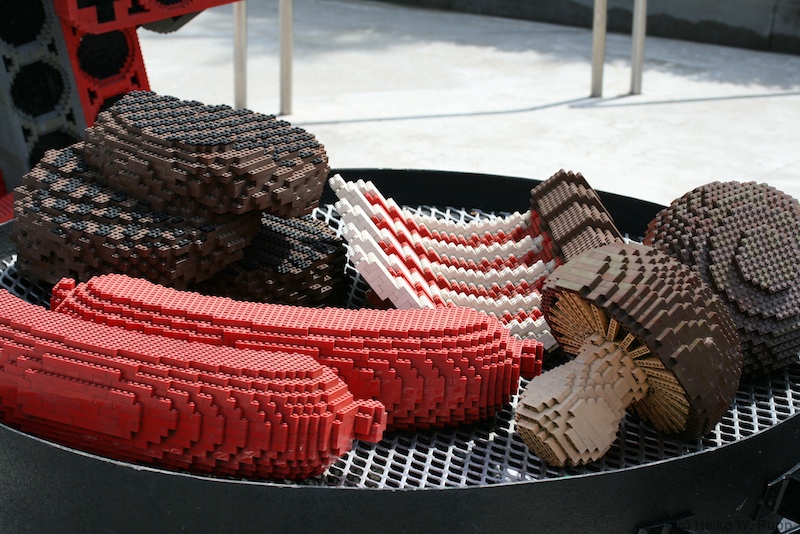
After this we went to lunch to the Dino-Grill. On the next picture you'll see some typical food here :-)
IMG_3734.jpg


Otherwise Legoland featured some wild animals:

IMG_3738.jpg


IMG_3751.jpg
IMG_3804.jpg


Knights on their horses:
IMG_5873.jpg


Driving schools:
IMG_3800.jpg


And a lot of other tourists:
IMG_3823.jpg


The kids really liked the visit to Legoland and Orlando is very willing to go there soon again. Actually as he was rejected at two places for being to small, he is even now drinking milk to accelerate his height growth.

Thursday, August 07, 2008

Don't be afraid to use a profiler

While developing on RHQ I encountered several situations where things were slow. One starts to look at the code, add a few print statements here and there and tries to guess what it happening.
Running the whole show through a debugger usually also doesn't help as digging deep into method calls will let you run into transaction timeouts from which point on, results are just useless.

Luckily there is a different sort of debugging help: Profilers like jProfiler from ej-technology, the one built into NetBeans, TPTP in Eclipse and others.

Profilers like jProfiler give you a few different ways to look at your application. For this discussion about performance, I will concentrate on the cpu usage part, as this is the most relevant for our case.
But actually (and this is what my presentation at Java Forum Stuttgart was about) they also make very nice debugging helpers.

Differentiation Profiler vs. Debugger


Before I dive deeper into the subject, I want to give a sort differentiation between profiler and debugger.

Debugger


  • Stepping through individual statements of the code
  • Stops the execution, so not for production use
  • Allows to see the content of individual variables
  • Hard to see the root cause of slowness, as this might be deep down in used libraries.


If the application code you want to step through is large, you will most likely run into transaction timeouts, which renders all results invalid.

Profiler


  • Application runs normally (but slower)
  • No way to see individual variable content
  • Easy way to get call graphs through the application


How to tackle the issues


Suppose you want to participate in RHQ and ask yourself "what happens if I click here?"
RHQ_gui.png


With a debugger this is hard do tell. You could search through the code for this string. And then try to find out if this is a Struts-page or a JSF page or you could look at where this link is pointing to and try to determine the resulting page from this.

With a profiler the steps could be as follows:


  • Instrument the RHQ server with in a profiler specific way (have a look at the profiler vendors manual)
  • Start the application and navigate to the above page
  • Start the profiler and start profiling CPU usage
  • Click on the link
  • When the result page is rendered, stop CPU profiling
  • Start looking at the timing tree as outlined below


CallTree1.png


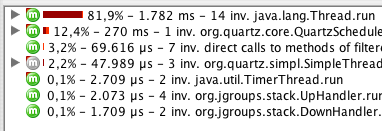
Generally open the node with the most CPU usage (Thread.run, the top line here).

This will give a subtree view like this:

CallTree2.png


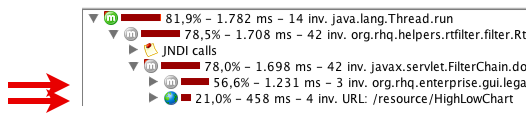
Here we see that the CPU time is spent in 3 invocations of some org.rhq.enterprise.* method and also in 4 calls to a HighLowChart. Here we are interested in the org.rhq code, so we open this subtree:

CallTree3.png


And we see that those 3 invocations are actually 3 individual Struts actions. From here on it is easy to dive into them by either just opening the tree nodes again or by looking them up in struts-config.xml

Repeated invocations


Now that you know where time is spent, you want to improve the methods. Always going from the top can be tiring. Most profilers allow you to limit the display to just one method and its children.

Also its possible (at least with JProfiler) to add a trigger, that fires and starts profiling when a certain method is called and stops when the path of execution leaves this method again.


RHQ - tip of the day: Agent waiting at startup

Sometimes when you start the RHQ agent (on commandline), it will not proceed to the sending> prompt, but sit there and wait for something. This post will talk about some of the possibilities.

The server has rejected the agent registration request...


Well, this message from the agent actually goes on:


Cause: [org.rhq.core.clientapi.server.core.AgentRegistrationException:The agent asking for registration is trying to register the same address/port [172.31.7.7:16163] that is already registered under a different name [snert]; if this new agent is actually the same as the original, then re-register with the same name]


This means that the connecting agent is known as 'snert' to the server, but it was passing a different name to it on this start.

To solve this, start the agent with option --clean and give the correct name.

The agent will now wait until it has registered with the server...


By default (well, you had to answer the questions on about it), the communication ports for server-agent communication are as follows (yes, two unidirectional connections):

  • Agent to server: server is listening on port 7080

  • Server to agent: the agent is listening on port 16163


... and hangs there


This is an agent state where the server can not be reached (perhaps because it is down or because a firewall blocks the traffic.
So make sure port 7080 on the server machine is reachable from the agents machine. You can simply do this with a web browser like Safari or lynx or wget.

... and shows an additional error


Here, after a little time the agent will show a message like this:

The server has rejected the agent registration request. Cause: [org.rhq.core.clientapi.server.core.AgentRegistrationException:Server cannot ping the agent's endpoint. The agent's endpoint is probably invalid or there is a firewall preventing the server from connecting to the agent. Endpoint: socket://172.31.7.3:12345/....

This means that the agent was able to talk to the server (so this communication channel is ok), but
the other direction is failing. In the example above, the server was trying to reach an agent on IP 172.31.7.3 and TCP port 12345, which was probably blocked in the firewall.

The agent does not have plugins - it will now wait for them to be downloaded...


This usually means that the server has a different security token than the one the agent was sending.
This could come from the fact that the java preferences entry got mangled e.g by testing with different agent versions or VMs or ...

You will see this message only on initial agent startup when it does not have any plugins yet.
If plugins got downloaded in a previous run, you will probably run in the situation shown below.

If you see this on the agent, you should also see messages like this on the server side:

11:40:48,454 WARN [CommandProcessor] {CommandProcessor.failed-authentication}Command failed to be authenticated! This command will be ignored and not processed: Command: type=[remotepojo]; cmd-in-response=[false]; config=[{rhq.security-token=1217855913569-109582636-403140853869881172, rhq.send-throttle=true}]; params=[{targetInterfaceName=org.rhq.core.clientapi.server.core.CoreServerService, invocation=NameBasedInvocation[getLatestPlugins]}]

To solve this, start the agent interactively with the --clean option.

Agent startup is ok, but ping command fails


Here, the agent successfully starts, but you will e.g not see any new metric data coming in from this agent. When you give the ping command on the agent command line you will see something like:

sending> ping

Pinging...

Failed to execute prompt command [ping]. Cause: org.rhq.enterprise.communications.command.server.AuthenticationException:Command failed to be authenticated! This command will be ignored and not processed: Command: type=[remotepojo]; cmd-in-response=[false]; config=[{rhq.security-token=1214208960346-102975580-7334156733284942657, rhq.send-throttle=true}]; params=[{targetInterfaceName=org.rhq.enterprise.communications.Ping, invocation=NameBasedInvocation[ping]}]


This is basically the same as above. Your server log should also be full of those CommandProcessor.failed-authentication messages. Solution as in the previous section.