Friday, July 15, 2016

Sabotage

Mein Beitrag zum Comic-Collab von Schlogger zum Thema Sabotage.

Ich denke Katzenhalter kennen die Situation wenn dringend etwas erledigt werden muss :-)

Thema für den 15. August: „Nichts Neues“
Mit dabei im Juli:
Schlogger
Skizzenblog
Badham
Isla Volante
Mic At Six
OnlineComics
Demystifikation
Karrakula
Dramatized Depiction
Jane War
Catnipsflavour
Schisslaweng
GoboPictures Rainer Unsinn
Schoolpeppers
Mal-Gries Rainking
Lisa Frühbeis

Monday, June 27, 2016

Using Hawkular-services via Docker [updated x3]

As you may know, we have started to create the Hawkular-Services distribution, which we try to build weekly. This distribution comes without embedded Cassandra, with no default user and also without a UI (we plan on re-adding a basic UI).

But you must not fear.

Running Hawkular-services is pretty easy via Docker.

The scenario

Let me start with a drawing of what I want to do here:

Hawk service via docker
Setup of Hawkular-services via Docker

In this scenario I run a Docker daemon (which is extremely easy these days on a Mac thanks to DockerForMac (Beta)). On the daemon I run a Hawkular-services container, which talks to a Cassandra container over the Docker-internal network. On top of that I have two WildFly10 containers running ("HawkFly"), which have been instrumented with the Hawkular-agent.

Running

For the purpose to setup linking and data volumes I am using docker-compose. The following is the docker-compose.yml file used (for the moment all images are on my personal account):

# set up the wildfly with embedded hawkular-agent
hawkfly:
  image: "pilhuhn/hawkfly:latest"
  ports:
    - "8081:8080"
  links:
    - hawkular
# The hawkular-server
hawkular:
  image: "pilhuhn/hawkular-services:latest"
  ports:
    - "8080:8080"
    - "8443:8443"
    - "9990:9990"
  volumes:
    - /tmp/opt/data:/opt/data
  links:
    - myCassandra
  environment:
    - HAWKULAR_BACKEND=remote
    - CASSANDRA_NODES=myCassandra
# The used Cassandra container
myCassandra:
  image: cassandra:3.7
  environment:
    - CASSANDRA_START_RPC=true
  volumes:
    - /tmp/opt/data:/opt/data

To get started save the file as docker-compose.yml and then run:

$ docker-compose up hawkular
This starts first the Cassandra container and then the Hawkular one. If they do not yet exist on the system, they are pulled from DockerHub.

After Hawkular has started you can also start the HawkFly:

$ docker-compose up hawkfly

Update

Right now if you would directly do docker-compose up hawkfly the agent would not work as the hawkular server is not yet up and the agent would just stop. We will add some re-try logic to the agent pretty soon.

I have pushed a new version 0.19.2 of HawkFly that has the retry mechanism. Now it is possible to get the full combo going by only running

$ docker-compose up hawkfly

Running without docker-compose

On my RHEL 7 box, there is Docker support, but no docker-compose available. Luckily docker-compose is more or less a wrapper around individual docker commands. The following would be a sequence that gets me going (you have to be root to do this):

mkdir -p  /var/run/hawkular/cassandra
mkdir -p  /var/run/hawkular/hawkular
chcon -Rt svirt_sandbox_file_t /var/run/hawkular

docker run --detach --name myCassandra -e CASSANDRA_START_RPC=true \
    -v /var/run/hawkular/cassandra:/var/lib/cassandra cassandra:3.7

sleep 10

docker run --detach -v /var/run/hawkular/hawkular:/opt/data \
  -e HAWKULAR_BACKEND=remote -e CASSANDRA_NODES=myCassandra \
  -p 8080:8080 -p 8443:8443 --link myCassandra:myCassandra \
  pilhuhn/hawkular-services:latest

Looking forward

There is an open Pull-Request to the Hawkular-Services Docker build as a part of a release and make it available via DockerHub on the official Hawkular account.

With this PR you can do

$ mvn install
$ cd docker-dist
$ mvn docker:build docker:start

to get your own container built and run together with the C* one.

Open questions

Right now I put in the default user/password and if the agent inside the hawkular-container should be enabled at image build time. Going forward we need to find a way to pass those at the time of the first start. The same applies (probably even more) to SSL-Certificates.

Storing them inside the container itself does not work going forward, as this way they are lost when a newer version of the image is pulled and a new container is constructed from the newer image.

Monday, May 09, 2016

Introducing HawkFX

As I said before, I started playing with JRubyFX. And for me learning something new best works with a use case, so I started creating an inventory browser for Hawkular.

Why JRubyFX?

Let's first start with "What is JRubyFX" anyway? JRubyFX is JavaFX brought to the Ruby world by the means of JRuby. This means that you can implement UIs with the help of the JavaFX framework and use its components and tools to build the UI. The difference to plain JavaFX is though that all the implementation code is written in Ruby and run by JRuby on the JVM.

I was doing a bit of JavaFX in the past and I wanted to generate a standalone inventory browser for Hawkular. Now that I have been working with Ruby lately and we already have the Hawkular client gem, I thought I'd give JRubyFX a try.

And I have to say this is pretty cool.

Some screenshots

login screen
Login screen
Main screen with chart
Main screen with inventory browser (left) and metric chart

The main screen shows a tree view on the left that displays the feeds as top level elements. Opening a feed will show recursively the resources and metrics. Clicking on a metric gets it charted on the right side.

Alerts and Events
Alert and Event list

A menu item in the main screen opens the alerts browser that allows to peek at alerts and events in the system.

Like in the main screen, there is a context menu that will allow to view the raw object as shown below:

Raw event display
Raw display of an event

Custom components

The time range picker on the main screen and alert screen is a custom component, that was implemented once with a .fxml file and some Ruby code:

class TimePicker < Java::javafx::scene::layout::HBox
  include JRubyFX::Controller

  fxml 'TimePicker.fxml'

  def initialize(caller, callback)
[..]
end

Including it is pretty simple too:

    box = find '#alertEventTopBox'
    box.children.add time_picker(self, :set_time_range)

In the first line we find the HBox to add the picker and then just add it to the children of the box. Done.

Running and code

HawkFX is available on my GitHub account at https://github.com/pilhuhn/hawkfx. To run the tool you need JRuby 9

If you are using rvm you can select it via

rvm use jruby-9.0.5.0

install and use bundler to install the required gems

gem install bundler bundle install

then run

jruby hawkfx.rb

Enjoy! :-)

Tuesday, May 03, 2016

Presenting at ManageIQ Design Summit 2016

I have the luck to go to the ManageIQ Design Summit 2016 in Mahwah, New Jersey at the beginning of June. And not only that, but also to be able to present there (more about this in a moment).

You may be looking at the web site of ManageIQ or the Design summit and think "why the heck is the Java and JBoss guy talking at a Ruby conference"? And the answer is simple:

Hawkular and ManageIQ are collaborating on the future of Middleware management.

And so I will talk about "Adding middleware to the game", describing the current state of Red Hat middleware and monitoring with RHQ and Hawkular, the integration with ManageIQ that we are already working on. And also the path and vision going forward.

ManageIQ has all the knowledge about the operating system and infrastructure the Middleware servers are running on, where Hawkular only provides some basic information. ManageIQ on the other hand has no notion of applications yet, wich is the domain of Hawkular. ManageIQ can also be used to provision new VMs and containers with Middleware in them, which can then be monitored and managed by Hawkular.

If you are close by, join me :)

NB: while I am there I will try find some of the nearby Geocaches, as New Jersey is still missing on my list (as so many other states in he US :)

Saturday, April 23, 2016

Welcome GSoC 2016 Students to JBoss

JBoss.Org has the luck of being selected as one of the mentoring organizations for this years issue of Google Summer of Code.

On Friday April 22nd, Google has announced the 10 students that will all work with JBoss. Those students with their project are:

  • Idel Pivnitskiy: AeroGear WebPush and UnifiedPush Server integration
  • rohitmohan96: Ceylon Markdown
  • Lucas Werkmeister: Ceylon TypeScript Loader
  • Samuel Richardson: Drools Rules in Minecraft
  • Anton Gabov: Smart HTTP/2-based protocol for Infinispan
  • Austin Ko: Hawkular-agent For Vert.x
  • mincongh: Hibernate Search: JSR 352 batch job for re-indexing entities
  • Anuj Garg: Improve existing Android client of Hawkular
  • Tugba: Teiid HDFS Translator/Connector
  • dimcho: Test scheduling for large test suites

We also want to thank all the other students for their in total over 70 proposals that they have submitted.

See also the GSoC project page for more details and the announcement post from Google for further information.

Sunday, March 20, 2016

Playing with JRubyFX

I started looking at JRubyFX as a combination of using a proven UI solution with Ruby as the programming language and I have to admit that I am impressed with how little it takes to get a UI done -- especially when it is driven by FXML.

Unfortunately the learning curve is steep, as one has to learn JavaFX and the special way JRubyFX calls the JavaFX classes and methods. And unfortunately, Google is not returning too much results here.

Anyway: this little code already creates GUI and populates a TreeView with elements it pulls from a remote server.

require 'jrubyfx'
require 'hawkular_all'

fxml_root File.dirname(__FILE__)

class HawkFx < JRubyFX::Application

  def start(stage)
    with(stage, title: 'Hello World!', width: 800, height: 600) do
      fxml HawkFxController
      show
    end

    stage.show()
  end
end

class HawkFxController
  include JRubyFX::Controller
  fxml 'fxmain.fxml'

  def login # callback from the login button
    creds = { :username => 'jdoe' ,
              :password => 'password' }
    url = 'http://localhost:8080/hawkular/inventory'
    @inventory_client = Hawkular::Inventory::InventoryClient.new(url, creds)
    @tenant = @inventory_client.get_tenant
    @FXMLtextArea.text = "Tenant: #{@tenant}"
    feeds = @inventory_client.list_feeds

    show_initial_tree(feeds)

  end

  def show_initial_tree(feeds)
    tree_root = tree_item('Feeds') do
      feeds.each do |feed|
        item = tree_item(feed) # this already adds the item to the root
      end
    end
    # bind to the view from fxml
    @FXMLtreeView.setRoot(tree_root)

    tree_root.setExpanded true
  end
end

HawkFx.launch

Thursday, March 17, 2016

Reacting on IoT data with Hawkular

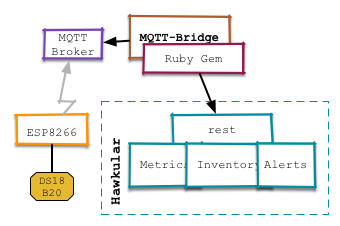
In the first post I have been talking about how send IoT sensor data to the metrics subsystem of Hawkular and then how to register the metric in Hawkular so that it can be graphed in the console.

In this article I will talk about how the Hawkular alerts component (that is already available in Hawkular-full) can be used to react on incoming data and make an LED on an Arduino blink.

DSC 0160
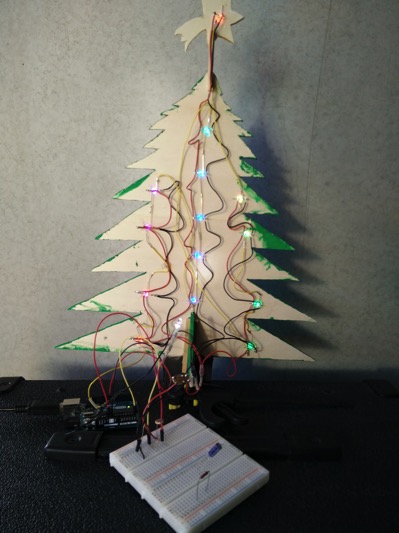
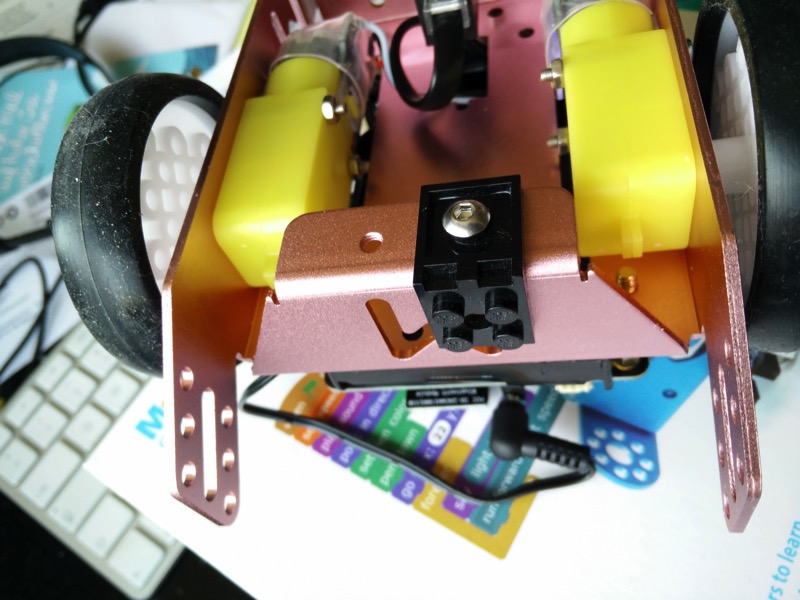
Arduino Uno with Ethernet shield and yellow LED

For the Arduino I have added a cheap Enc28j60 based Ethernet shield. There is a standard library available, that allows to easily set up a web server, which we are using (in fact the code is mostly from that example).

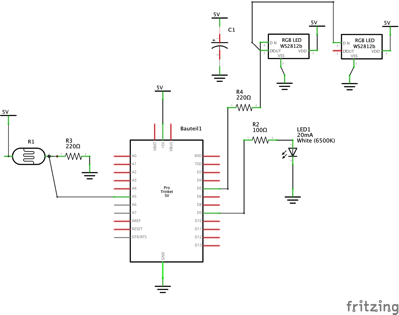
The new (full) setup is like this:

Hawk alert
Setup with Arduino as actor

Alerting

Hawkular already has an alerting component built in, that allows to compare incoming values with thresholds and then invoke plugins to forward the fired alert via email, to irc channels and many more way of communication. The plugin we are going to use here is the webhook one. As in the standard Hawkular distribution only the email plugin is present we will need to install the webhook plugin first:

Check out Hawkular-alerts

git clone https://github.com/hawkular/hawkular-alerts.git
cd hawkular-alerts

Build hawkular alerts :

mvn -Pdev -DskipTests install

Now you can copy the plugin to the Hawkular-server

cd hawkular-alerts-actions-plugins
cd hawkular-alerts-actions-webhook
cp hawkular-alerts-actions-webhook.war \
   $HAWKULAR/modules/system/layers/hawkular/org/hawkular/nest/main/deployments/

As Hawkular does not pick this up automatically you need to restart the Hawkular server after copying the webhook.war over.

Set up alerting

I have modified the ruby script to pull in a configuration file (in YAML format):

---
16617927:40.176.91.120.5.0.0.125:
  :name: Living room
  :alert:
    :comparator: :gt
    :value: 25
The first line is the id of the metric to which the following lines apply to. Second line is the display name for the UI. The next section then sets up alerting.

Let's have a look how this looks in code (you can see the full code on GitHub)

Register the webhook to be used below:

@webhook_props = { url: 'http://172.31.7.177/',   # target server
                   method: 'POST' }               # http verb
@alerts_client.create_action 'webhook', "send-via-webhook-#{metric_id}", @webhook_props

Set up a trigger and a condition, trigger first

  t = Hawkular::Alerts::Trigger.new({})
  t.enabled = true
  t.id = "trigger_#{metric_id}"
  t.tags = { :resourceId => "#{feed}/#{res_id}" }
The tags tell the UI on which resource the Trigger applies and thus enables showing the alert in the Hawkular UI

Next the condition:

  c = Hawkular::Alerts::Trigger::Condition.new({})
  c.trigger_mode = :FIRING
  c.type = :THRESHOLD
  c.data_id = metric_id
  c.operator = alert[:comparator].to_s.upcase
  c.threshold = alert[:value]

And then finally as we do not only want the alert to show in the UI, but also be forwarded to our Arduino with the webhook, we need to attach the webhook to the Trigger. Plugin id is webhook and the action_id is what we have set up above.

  # Reference an action definition
  a = Hawkular::Alerts::Trigger::Action.new({})
  a.action_plugin = 'webhook'
  a.action_id = "send-via-webhook-#{metric_id}"
  t.actions.push a
And then we can create the trigger, which will be active immediately.

  @alerts_client.create_trigger t, [c], nil

Fire away

Now when a value above the threshold comes in, the webhook will be triggered, it will open a http connection to the Arduino and the LED will blink.

In addition the alert will also be shown in the Alert Center in the Hawkular UI:

Bildschirmfoto 2016 03 17 um 16 32 37
List of high temperature alerts in the alert center.

More

Note that the above trigger definition is pretty simple and only has one comparator. Also the trigger fires each time a value above the threshold comes in. In a more real world scenario one would add some dampening that the trigger only fires when the measurement is a few times over the threshold for some interval. Or if you start your air-conditioning, you would set the trigger to auto-disable and then have a comparator to switch it back on after the temperature has fallen below a certain level.

There is even a lot more you can do with Hawkular Alerts past the above, including standalone deployment for embedding it in your own application.

Some further reading:

Hawkular Alerts for Developers -- pretty comprehensive documentation of Hawkular Alerts.
Introduction to AutoResolve triggers
Using Hawkular Alerts as a standalone engine

Wednesday, March 02, 2016

Send IoT data to Hawkular-full

In a previous blog post, I was talking about how to send IoT sensor data to Hawkular-metrics.

While this already works quite well, it also lacks the integration with other parts of Hawkular, namely Inventory and Alerting.

In this blog post I will talk about integration with Inventory and how to view the data in the Hawkular-UI. An upcoming article will then talk about Alerting.

I have modified the setup from the last post a bit:

Bridge arch
New setup with a Ruby client

Instead of PTrans I've written a small Ruby client, that makes use of the Hawkular-Client-Ruby ruby gem (it needs version 0.2.1, that has not yet been published to RubyGems.org. In addition it uses a MQTT gem, which makes the code pretty short.

The Ruby client MQTT-bridge now listens on /hawkular/+ topics. Metric arriving on /hawkular/metrics are forwarded as such and registration messages on /hawkular/register are used to register the external resource like the ESP8622 micro controller in Hawkular inventory.

The following is an example registration message:

{"feed": "esp16617927",
  "rt":"esp8266",
  "r":"mcu16617927",
  "mt":{
    "id":"thermo",
    "unit":"NONE",
    "type":"GAUGE",
    "collectionInterval":0
  },
  "m":{
    "id":"16617927:40.176.91.120.5.0.0.125",
    "mt":"thermo",
    "na":"thermo_40.176.91.120.5.0.0.125",
  }
}

You can get the client from https://github.com/pilhuhn/hawkular-mqtt-bridge and then easily run it via

$ ruby lib/hawk.rb

If you are not using a Hawkular-Server on localhost with default user, then you first need to modify the ruby code at the top.

The client will connect to the Hawkular server and then wait for messages on the MQTT topics.

The client code is still rather simplistic and does not spool data when the target Hawkular server is down.

UI

Since Hawkular 1 Alpha11 we have an Explorer (as easter egg :-) that allows to browse through inventory and to show resources and their metrics. The following shows the explorer with a chart from the thermo sensor for the last 12h.

Hawkular screenshot with chart data from thermo sensor
Hawkular UI with chart of sensor data from last 12h

The chart shows a peak at 1am - I have no idea why it is there. Possibly one of my cats examined the sensor :)

ESP Sample code

I have also provided a sample Lua script, that can be used on a ESP8266 like the Adafruit Huzzah shown in the previous post.

As the stock Huzzah comes with NodeMCU Lua 0.9.5 which was not working well for me, I have flashed it with a newer version of NodeMCU Lua. This is now running a firmware with the following modules:

NodeMCU custom build by frightanic.com
	branch: master
	commit: c8037568571edb5c568c2f8231e4f8ce0683b883
	SSL: false
	modules: cjson,file,gpio,i2c,mqtt,net,node,ow,rtcmem,rtctime,sntp,tmr,uart,wifi,ws2812
 build 	built on: 2016-02-18 08:33

Alerting?

In an upcoming post I will talk about alerting in Hawkular to act on unusually high or low temperatures.

Monday, February 22, 2016

Flashing new NodeMCU Lua firmware to Adafruit Huzzah ESP

Adafruit delivers the Huzzah ESP with NodeMCU 0.9.5, which is pretty old.

So I was thinking of a newer version. The process is pretty well described on nodemcu.readthedocs.org. Unfortunately it also says

The address for esp_init_data_default.bin depends on the size of your module's flash. ESP-01, -03, -07 etc. with 512 kByte flash require 0x7c000. Init data goes to 0x3fc000 on an ESP-12E with 4 MByte flash.

After digging through Adafruit docs (they do not explicitly mention the type of ESP) and also looking at the output of node.info() I figured out that the Huzzah ESP has an ESP12 with 4MB

I got my self a new image from the awesome on demand build service and then flashed it like this:

$ python esptool.py --port /dev/cu.usbserial-AI02CSDU \
   write_flash 0x00 ../nodemcu-master-15-modules-2016-02-18-08-33-47-integer.bin \
               0x3fc000 ../esp_iot_sdk_v1.4.0/bin/esp_init_data_default.bin
Connecting...
Erasing flash...
Took 2.12s to erase flash block
Wrote 423936 bytes at 0x00000000 in 45.8 seconds (74.1 kbit/s)...
Erasing flash...
Took 0.10s to erase flash block
Wrote 1024 bytes at 0x003fc000 in 0.1 seconds (85.4 kbit/s)...

Future updates of the firmware to newer versions no longer need to flash the esp_init_data_default.bin file.

Thursday, February 11, 2016

Sending IoT sensor data to Hawkular-Metrics via MQTT

The other day I was writing about 'RHQ-Metrics and Grafana' and was describing how you can incorporate data from other system management agents.

Fast forward a bit and Raider is now called Twix and RHQ-Metrics has morphed to Hawkular-Metrics under the Hawkular.org umbrella.

Recently I have also been playing with Arduino and Co. and got myself also an Adafruit Huzzah ESP8266 board. This is a breakout board with the ESP8266 microprocessor on, that has a bunch of IO pins and built-in WiFi. With the default firmware it is programmed in Lua.

Huzzah on Breakout board
Huzzah on breakout board

While one can program the ESP from the Arduino IDE, I thought to give Lua a try (also to get a feel for the difference to the WiPy, that also comes with Python as a high level language). What is nice with the ESP and the NodeMCU firmware is that it already comes with support for networking, 1-wire, MQTT and more out of the box.

To get started I took the hello-world of IoT-sensors and hooked up a DS18B20 OneWire thermo sensor (for those old enough, I did that in the past with RHQ) up to the ESP and then have this communicate to a MQTT Broker (mosquitto).

Hawkular Metrics IOT
Setup diagram

As said before we have with Ptrans a universal protocol translator that can be used to feed data from collected, ganglia and others into Hawkular-Metrics. I've taken that and added support for MQTT (in my personal repo for now). Ptrans will now connect to a broker and listen on the '/hawkular/metrics' topic for data that needs to be in graphite format like

path value [timestamp_in_s]

The timestamp is optional, as in my case I was not able to get any real time clock data from the micro controller (there seem to be variants that have a clock on board).

To see the data that is coming from the device I can just run

$ mosquitto_sub  -t /hawkular/+
16617927:40.176.91.120.5.0.0.125 24.625
16617927:40.176.91.120.5.0.0.125 23.9375
16617927:40.176.91.120.5.0.0.125 23.8750

So here NodMCU with ID 16617927 and thermo sensor 40.176.91.120.5.0.0.125 is reporting around 24 deg Celsius.

I will post more on the topic in a laster posting.

References:

Tuesday, January 05, 2016

Arduino powered X-Mas tree

In 2014 we got two cats and decided not to have a classic christmas tree. I also started playing with Arduino and other gadgets, so this made me think to have an Arduino powered tree in 2015. In November my daughter and I started to build the tree.
The tree
The tree has 14 RGB LEDs (basically WS2812 ones) from Sparkfun (or EXP-Tech).
Pinout of the LEDs is as follows:
LED Pinout
LED-Pinout (click to enlarge)
.
With that, the tree wiring got relatively easy by bending the LED pins in the four different directions and then connecting all 5 Volt pins with the red wire, GND with the black and chaining data in and out either by directly soldering the pins or via the yellow wire:
Backside of the tree
Detail view:
Wiring detail
The overall schematic then looks like this (I am using an Arduino at the moment, but will use a TrinketPro in the future):
Weihnachtsbaum Schaltplan
Schematic (click to enlarge)
I've added a photo resistor and a white diode to provide some lighting of the tree front, as at night, the RGB LEDs are so light, that the tree itself can't be seen. The resistor value also serves to dim the RGB LEDs at night.
The software driving the LEDs is basically the Strandtest one that Adafruit delivers as example for their Neopixel Library. I've modified the code a bit to also show other patterns.
In the future we will add a stand for the tree that will also house the electronics and will also host some additional surprise that I will talk about in a future post :)

[ UPDATE 2016-12-11 ]

I've added a stand and the dedicated TrinketPRO:


Tuesday, October 27, 2015

WiPy on the home network

Recently there was a Kickstarter about "an Arduino that runs Python", the WiPy. This is a small IoT board with WiFi on it (which is not available on stock Arduinos) for an attractive price. And being able to use a high level language along with a lot of existing libraries makes it attractive too.

A few days ago I got the WiPys that I backed and the first obstacle to get the running was the power supply as they do not have a (micro) USB connector on board (and I also did not back the extension boards they offered).

Luckily I still had an old defunct USB hub from which I could solder out the connector and put it on a small PCB for this purpose (while doing that exercise I also found out that the 5V of the USB port are allowed to be 4.75-5.25V and on the end of a hub even being as low as 4.4V).

WiPy on BreadBoard
WiPy on Breadboard with USB power supply connector.

Now that the WiPy is on the breadboard, I set up my computer to scan for the WLAN of the WiPy and then telneted into the device. I poked around and tried to inspect the WLAN settings as described in the manual:

>>> from network import WLAN
>>> wlan = WLAN() # we call the constructor without params

This immediately made the connection drop. It turned out I needed to first update the firmware to the latest version (v1.1 at time of the writing), which was painless (but a bit confusing, as they also supply a bootloader.bin, that is not needed).

After the firmware upgrade the above worked and I tried to change the device to talk to my home network. The caveat here is that at the moment you issue

wlan.init(WLAN.STA)

to put the machine into station mode (default is being an access point), the connection drops. Some users have solved that by connecting via UART and serial line, but I did not really want to go that route.

Instead I edited boot.py on my local computer and then uploaded it via ftp into /flash. I found out, that if you don't terminate the ftp client and have a telnet connection open as well, I could easily (syntax) check the uploaded file by pressing Ctrl-D in the terminal:

MicroPython v1.5-1-ge954604 on 2015-10-21; WiPy with CC3200
Type "help()" for more information.
>>>    <control-D>   <-- here
PYB: soft reboot
Traceback (most recent call last):
  File "boot.py", line 17, in 
NameError: name not defined

The WiPy tells me that there is an error in my file, so I edit it locally and upload it again via the ftp connection. And only at the end when the WiPy is happy, I press the hard-reset button.

Now for reference my boot.by that worked for me:

from network import WLAN

SSID = 'home_SSID'         # SSID of your home network
AUTH = (WLAN.WPA2, 'very_secret') # WPA secret as 2nd param
IP = '10.1.2.42'           # Fixed IP the device should get
ROUTER = '10.1.2.3'        # IP of your router
DNS = '10.1.2.3'           # IP of your DNS server
NETMASK = '255.255.255.0'  # Netmask to use

import machine

wlan = WLAN()

if machine.reset_cause() != machine.SOFT_RESET:
    wlan.init(WLAN.STA)
    # configuration below MUST match your home router settings!!
    wlan.ifconfig(config=(IP, NETMASK, ROUTER, DNS))

if not wlan.isconnected():
   wlan.connect(ssid=SSID, auth=AUTH, timeout=5000)
   while not wlan.isconnected():
      machine.idle() # save power while waiting
   print('WLAN connection succeeded!')
Parts of that script were taken from the WiPy WLAN tutorial and this WiPy Forum post.

Tuesday, October 06, 2015

Driving a Servo on Arduino from a remote Arduino over secured radio

In Stuttgart, there is now a Hackergarden Meetup group that tinkers with whatever the people showing up want to tinker with.

In the 1st edition I was doing some hacking on Arduino where two Arduinos were transmitting data over an encrypted radio via a RFM69 radio chip. This setup is described on the Codecentric blog.

Now in the 2nd edition we wanted to build on this and control a servo motor on one Arduino remote from the other one. This video shows the end result:

On the left you see a potentiometer, that is read out and the value is then shown on the Neopixel ring. The value is also transmitted via RFM69 chip to the other Arduino that has the receiver and which then drives the servo.

The setup on the server side looks like this:

Poti data sender Steckplatine

On the receiver side we used a "normal" setup like the one described on the before mentioned report. We had an issue for a while, as the servo was on a port that was also used by the RFM69 code, but once we fixed that, it worked.

The client side code is in my GitHub fork of the Hackergarden repository - I hope it will be merged soon :)

Sunday, August 09, 2015

mBot and Lego

Recently I got my Kickstarter-backed mBots from Makeblock, some cute little robots with basically an Arduino-brain.

And as the Kickstarter campaign was successful, I also got one of the nice LED-Matrix displays with it.

Now I wanted to mount the display on the front like they show on some pictures and the range sensor as well. Obviously that does not work as they go into the same place. Unfortunately there was no additional mounting bracket supplied.

Next try was to mount it at the back, but there are no mounting holes with (or without) thread available. Luckily we have a larger Lego collection and the website claims The chassis is compatible with Lego&Makeblock parts. Unfortunately this is not entirely true, as the holes in the mBot chassis are just a bit too small for the normal lego connector pegs or axles.

But don't fear :-)

First, with some M4 screws and nuts it is easy to just mount lego parts with the help of those:

IMG 20150809 125521

And luckily Lego also supports being mounted with M3 screws and nuts, so I basically created an adapter with some Lego Technic parts:

IMG 20150809 145058~2

And finally I was able to mount the display at the back of my mBot:

IMG 20150809 151116~2

I saw an image on the forums where someone mounted the display (for my gusto upside down) and the range sensor on top, but I think this way the sensor may be too high up and not find all obstacles.

Tuesday, July 07, 2015

Running OkHttpClient from within WildFly 9 (subsystem)

A few days ago WildFly 9 was released and one of the highlight for sure is the support of HTTP/2.0 in the Undertow web subsystem. As Hawkular has recently moved to use WildFly 9 (from 8.2) as its underlying server, it was sort of natural to try to use http2 for connections from the Hawkular-Wildfly-Monitor client to the server.

One peculiarity here is that in my case the monitor client is running inside the Hawkular server, but at the end it does not matter if it is running inside a standalone WildFly server or inside the Hawkular server.

The setup

Greg Autric has written a blog post, that shows how to set up Http2 in WildFly with the offline CLI, which also works well in the Hawkular case. As the question came up: that setup also includes the https setup inside WildFly.

The only thing that is a bit problematic in the post is that setting JAVA_OPTS before starting the server will ignore all the settings from standalone.conf, which in the current Hawkular version will prevent a correct start of the bus broker (because the IPv4Only flag is lost).

So in my opinion it is better to modify standalone.conf to *add* those options to the other options that are already there:

  JAVA_OPTS="-Xms64m -Xmx512m -XX:MaxPermSize=256m -Djava.net.preferIPv4Stack=true"
  JAVA_OPTS="$JAVA_OPTS -Xbootclasspath/p:/opt/hawkular-1.0.0.Alpha3-SNAPSHOT/alpn-boot-8.1.3.v20150130.jar"
  JAVA_OPTS="$JAVA_OPTS -Djboss.modules.system.pkgs=$JBOSS_MODULES_SYSTEM_PKGS -Djava.awt.headless=true"

Now when I start the Hawkular server and try to connect with FireFox on the https port, I get the warning about the self signed certificate, but can connect and get the UI over a Http2 connection as described in Greg's post.

Running the OkHttpClient

As said before, the WildFly monitor client is a subsystem inside the WildFly server. I wrote a bit of client code, that is running in the subsystem (shortened):

   OkHttpClient httpClient;
   httpClient = new OkHttpClient();

   // DO NOT USE IN PRODUCTION, allow all hostnames
   httpClient.setHostnameVerifier(new NullHostNameVerifier());

   setKeystore(httpClient); // Use custom ssl factory

   String uri = "https://...:8443/";

   Request request = new Request.Builder()
            .url(uri)
            .addHeader("Accept", "application/json")
            .get()
            .build();

   // sync execution just for the post
   Response resp = httpClient.newCall(request).execute();
   System.out.println(resp.toString());

Fail?

This code works well except for the fact that is always uses Http(s)/1.1 and never Http2 as you can see from the output of the last println statement:

  Response{protocol=http/1.1, code=204, message=....}
I was playing around with various options up to a point where I thought, I have to extract the code to a standalone Java SE class to better debug it in isolation.

I wrote the class, set the bootclasspath, ran it and it worked perfectly:

  Response{protocol=h2, code=204, message=....}

So what is the difference? I removed the bootclasspath setting for ALPN, reran and the connection fell back to http/1.1.

Which is kinda strange as my client subsystem is running inside the very same WilFly server, that is running Undertow and which is able to serve http2 requests and where I added the ALPN classes through JAVA_OPTS earlier.

Now remember that WildFly is using their own classloader system (jboss-modules), which is pretty powerful in isolating deployments and classes and restricting their visibility and/or leakage into areas where they should (not) be seen.

And this in fact is what happened here as well.

Success!

So I had to explicitly add the ALPN classes to my module.xml file for the monitoring client subsystem:

  <module xmlns="urn:jboss:module:1.3" name="${moduleName}">
    <resources>
      <resource-root path="clients-common.jar"/>
      [...]
      <resource-root path="okhttp.jar"/>
      <resource-root path="okio.jar"/>
    </resources>
    <dependencies>
      <!-- modules required by any subsystem -->
      <module name="javax.api"/>
      [...]
      <system export="true">
        <paths>
          <!-- Needed for HTTP2 and SPDY support-->
          <path name="org/eclipse/jetty/alpn"/>
        </paths>
      </system>
    </dependencies>
  </module>

From the above snippet, you can see that the okhttp and okio jars are packaged in the module and are made available to my client code as well.

Now that the module.xml has been adjusted, as is well and my subsystem is using Http2 :-)

Wednesday, May 13, 2015

Scripts with multiple actions in Textual5

Some may know Textual as a powerful IRC client on the Mac.

One of the interesting parts (to me) is that Textual allows to extend it via Scripts, that can be written in AppleScript or other scripting languages.

They have an introuction to write Scripts, which I've used to create some simple scripts.

What I always wanted to do it to have scripts that can do multiple things like


/away Gone fishing
/msg I'am out of here
/leave

To set myself into away mode, put a message in the channel and then leave it.

Unfortunately, this seemed impossible.

Yesterday I finally emailed their support and got an answer back that this is pretty simple: just put each command on a new line.

So a potential script could look like this:


on textualcmd(inputData, destinationChannel)

return "
/away Gone for the night
/nick zzZZzz
"
end textualcmd

to set may away mode and also change my nick. It is important to put each of the
command on the very first column of the line, as Textual does not remove leading spaces.

Two helpful links: Textual Command reference, list of IRC commands on Wikipedia.

UPDATE: the "WritingScripts" article meanwhile got updated to better reflect above use case.

Monday, February 23, 2015

Little extension board for the PI

Long time ago I've started creating a small extension board for the RaspberryPI to get some physical world into hacking.

Img of installed and running board
Board installed and running on the PI.

The first iteration was on a bread board with some wiring, then for the next iteration I took a stripe PCB and wired it there. Worked but was not pretty:

Prototype board

Anyway, as the concept worked out, I decided I need some printed circuits. I played around with some options, but nothing was really cool for hobbyists (and I did not want to manufacture them my self with all the chemicals needed). And then I found Fritzing, which was exactly right.

Not only does Fritzing produce boards, but it also a nice graphical editor application that can be used to create a schematic, assign parts from a large part library, (auto) route the schematic and send the result to production

Fritzing editor with PCB layout
Fritzing editor with routed PCB in both side view

After I created the layout etc. I sent the design to the Fritzing fab and got by PCBs back after around a week of round trip time.

Yesterday I now sat down with the PCB, some needed parts and my soldering iron and assembled the parts

Parts and PCB
The parts
After soldering the low profile parts
Low profile parts soldered in
Most parts soldered
Assembled

In the last image there was still the thermo sensor missing, as well as the 4th LED.

Now when that board is put on to the extension header of the PI (inner row, that is closer to the CPU, the following little shell script will light all LEDs and then display the current temperature every second


#!/bin/sh
set -x
cd /sys/class/gpio
for i in 10 22 27
do
echo $i > export
sleep 5
echo out > gpio$i/direction
sleep 5
echo 1 > gpio$i/value
done

cd /sys/bus/w1/devices/10-*
while true
do
cat w1_slave | grep t=
sleep 60
done

There is one line that may need tailoring depending on the variant of DS1820 thermometer chip you have


cd /sys/bus/w1/devices/10-*

One thing where I am not yet sure is if the DS1820 actually needs the phantom power. In an older experiment with the chip, I did not connect pin 3 at all. I think this additional power may even heat the thermometer chip, as the values that I currently get a are some 5-6 degrees too high.

To read the state of the push button you can use this script


cd /sys/class/gpio
echo 9 > export
cd gpio9
while true ; do cat value; done

If you are interested about more details of the board, you can look at this Fritzing page, where I've uploaded the .fzz file.

And if you are using RHQ, you can look at this agent plugin to use the LEDs and the thermometer chip from within RHQ.


Friday, February 06, 2015

Meet the Hawk!

Well, actually that is not Hawk, but HAWKULAR

Hawkular
(Non-official visualization)

Hawkular is the next generation monitoring (and management) project from JBoss incorporating the best features and knowledge from RHQ while at the same time improving on the less strong parts.

Hawkular is composed of a number of individual sub-projects that work together and deliver individual services. The design of those services is in a way that they could also be used standalone in other projects.

The currently most prominent sub-project is Hawkular Metrics, which you probably recall as "RHQ Metrics" and which just has released its version 0.2.7 under the old name. There is also an OpenShift cartridge available for it.

Other sub-projects are:

  • Hawkular-bus: asynchronous bus to connect the various parts. This is a message oriented bus currently running on Active MQ and providing an infrastructure for other projects to re-use.
  • Hawkular-alerts: alerting on incoming metrics (and other events).
  • Hawkular-ui-components: ui components such as Hawt.io 2 plugins and Angular directives that make up the Hawkular Console
  • Hawkular build tools: Helpers and definitions to build Hawkular

Similarly the

  • Wildfly-cassandra extension (run Cassandra 3 as an extension inside WildFly)
  • Wildfly-monitor extension (Monitor WildFly metrics and forward to a Hawkular Metrics instance)

have also been moved over to the Hawkular organization on GitHub

All the pieces are / will be assembled in the Hawkular project

All projects and sub-projects live in GitHub under the Hawkular organization. Right now we have set up the basic projects and other infrastructure. The overall issue tracker is setup at Jboss.org with individual trackers for the sub-projects (you can use the overall tracker and we dispatch).

Right now we are working on getting an end-to-end workflow and integration done for Hawkular.

Development discussions around Hawkular happen on the Hawkular-dev mailing list and you can find the developers hanging around on IRC at irc://irc.freenode.net/#hawkular.

And make sure to follow Hawkular on Twitter

Friday, December 05, 2014

RHQ 4.13 released

I am very pleased to announce the release of RHQ 4.13 as an
early gift from St. Nicholas :)


Screenshot of the RHQ UI showing some charts

This release contains a lot of bug fixes and smaller improvements, as well as some new features:

  • Alerts have a new status 'recovered', that can be filtered upon
  • The UI allows to hide elements that are not needed on a per user basis
  • The as7/WildFly plugin now supports runtime queues and topic subscribers
  • Further improvements in the Storage Nodes

As always RHQ is available for download in form of a zip archive. If you want to try out RHQ without too much setup, you can also use a pre-created Docker image
from https://registry.hub.docker.com/u/rhqproject/rhq-nodb/ (the link contains setup information).

Please consult the release notes for further details and a download link.

Maven artifacts will soon be available on Maven Central.

Special thanks goes to

  • Alan Santos
  • Andreas Veithen
  • Elias Ross
  • Jérémie Lagarde

for their code contributions for this release.

Friday, October 10, 2014

WildFly subsystem for RHQ Metrics

For RHQ-Metrics I have started writing a subsystem for WildFly 8 that is able to collect metrics inside WildFly and then send them at regular intervals (currently every minute) to a RHQ-Metrics server.


The next graph is a visualization with Grafana of the outcome when this sender was running for 1.5 days in a row:

Graphs of JVM memory usage
Graphs of JVM memory usageWildFly memory usage


( It is interesting to see how the JVM is fine tuning its memory requirement over time and using less and less memory for this constant workload ).


The following is a visualization of the setup:


Setup


The sender is running as a subsystem inside WildFly and reading metrics from the WildFly management api. The gathered metrics are then pushed via REST to RHQ-Metrics. Of course it is possible to send them to a RHQ-Metrics server that is running on a separate host.


The configuration of the subsystem looks like this:

<subsystem xmlns="urn:org.rhq.metrics:wildflySender:1.0">
<rhqm-server
name="localhost"
enabled="true"
port="8080"
token="0x-deaf-beef"/>
<metric name="non-heap"
path="/core-service=platform-mbean/type=memory"
attribute="non-heap-memory-usage"/>
<metric name="thread-count"
path="/core-service=platform-mbean/type=threading"
attribute="thread-count"/>
</subsystem>

As you see, the path to the DMR resource and the name of the attribute to be monitored as metrics can be given in the configuration.


The implementation is still basic at the moment - you can find the source code in the RHQ-Metrics repository on GitHub. Contributions are very welcome.

Heiko Braun and Harald Pehl are currently working on optimizing the scheduling with individual intervals and possible batching of requests for managed servers in a domain.


Many thanks go to Emmanuel Hugonnet, Kabir Khan and especially Tom Cerar for their help to get me going with writing a subsystem, which was pretty tricky for me. The parsers, the object model and the XML had a big tendency to disagree with each other :-)